From Viral ‘Behind The Hand’ Clips To Real-World Miracles: How To Build One One‑Handed Card Vanish You Can Use In Any Routine
Your feed makes this move look easy. Then you pick up a deck, try to copy the clip, and the card either flashes, sticks, drops, or only works if your phone is in exactly one spot. That is the real frustration with the viral one handed card vanish behind the hand tutorial trend. Most short videos show the prettiest half-second, not the part that matters. Grip, timing, cover, body angle, and how the vanish fits into an actual routine. The good news is you do not need a knuckle-busting flourish to make this play well for real people. You need one practical method, clean mechanics, and a way to hide the move inside natural action. If you build it that way, this vanish stops being a social media stunt and becomes something you can actually use at a table, in walkaround, or as a surprise ending when spectators think the card is still in play.
⚡ In a Hurry? Key Takeaways
- The best version of this vanish is not the flashiest one. It is the one you can do at chest height, from a slight side angle, without depending on the camera.
- Start by learning the back-of-hand display, then the finger clip, then the timing beat that makes the card seem to melt away.
- If a method only works for your phone lens and not for a live person standing two feet away, do not build a routine around it.
What this move really is
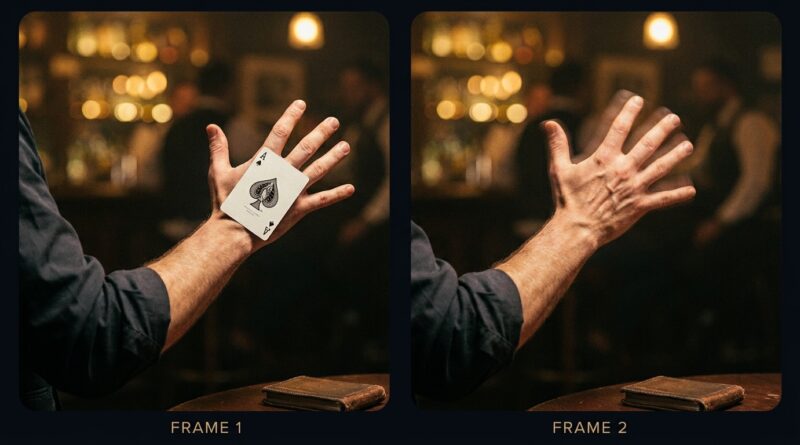
Most versions of the one handed card vanish behind the hand tutorial idea are built on the same basic picture. A card is shown at the fingertips, the hand turns or swings, the card travels behind the hand for a fraction of a second, and during that covered moment it is clipped, folded out of view, transferred, or aligned with the hand so the audience reads, “It vanished.”
That means the effect lives or dies on three things. First, the silhouette has to look clean. Second, the covered moment has to be brief. Third, your audience has to remember a card being there a beat before it is gone.
If you get those three right, the exact handling matters less than people think.
The practical build: a real-world version
For live use, the safest approach is a single-card handling that ends in finger palm or rear clip, depending on your hand size and confidence. I strongly suggest building the move in stages instead of trying to copy the final speed from a reel.
Stage 1: Start position
Hold one card by the lower short edge between thumb and first finger. Keep the card mostly vertical. Do not squeeze. Tension is what makes the card buckle or catch.
Your other fingers should look loose and innocent. That matters because spectators read relaxed hands as empty hands.
Stage 2: The behind-the-hand path
Now swing the card inward so it passes behind the back of the hand. Think of it as drawing a shallow letter C, not making a big dramatic flip. Smaller is better. Big motions create extra angle problems.
As the card passes behind the hand, the middle and ring fingers take over the card for a light clip. Your thumb releases. At this exact instant, the back of the hand becomes your curtain.
Stage 3: The vanish picture
Once the card is hidden behind the hand in clip, extend the first finger slightly and open the thumb away from the hand. This creates the visual message that the card is no longer being held.
Do not freeze too long. A tiny beat is enough. Show the empty-looking hand, then continue into the next action.
Stage 4: The exit
This is where a lot of tutorials fail. They teach the vanish, but not the clean-up.
Your best options are simple:
- Drop the clipped card onto the deck as the hand relaxes.
- Lap it if you are seated.
- Transfer it to a pocket while reaching for a pen, coin, or phone.
- Load it to the top or bottom of the deck during the next offbeat.
If you cannot answer “Where does the card go next?” you do not have a routine yet. You have a gif.
Grip details that make or break it
Non-techy explanation. Think of the card like a dinner plate and your fingers like shelf brackets. You are not crushing it. You are giving it just enough support so it stays in place during motion.
Use light pressure
Too much pressure causes snagging. Too little pressure drops the card. Aim for just enough control that the card moves with the hand and does not wobble.
Keep the card close to the hand
The farther the card travels away from your skin, the more likely it is to flash from the side. Tight path, better illusion.
Match your hand size to the method
If your hands are smaller, a poker-size card may feel cramped in rear clip. There is no shame in starting with bridge-size cards during practice. Once the muscles learn the path, move back to your normal deck.
Angles. The part reels never explain properly
This move is not angle-proof. Nothing in card magic is. But it can be angle-tolerant if you are sensible.
The sweet spot is one or two spectators in front of you, slightly to your thumb side. The danger zone is anyone low and hard to your clipping side.
Best working conditions
- Chest-high performance height
- Spectators in a 45-degree front arc
- Soft forward motion, not a stop-start jerk
Worst working conditions
- People seated far below your hands
- Bright side lighting that outlines the hidden card
- Surrounded walkaround with no body turn
A small body adjustment fixes a lot. Turn your torso a few degrees. Bring the clipping side slightly back. That tiny change often does more than hours of extra finger practice.
Why the vanish looks fake when you rush it
The camera-era instinct is to go fast. That is usually wrong.
Fast does not equal magical. Clear equals magical.
The audience needs a tiny before-and-after contrast. Show card. Move behind hand. Empty picture. Continue. If every part happens at top speed, the vanish reads as a flourish, not an impossibility.
A simple timing pattern
Try this count:
- One: show the card plainly.
- Two: bring it behind the hand.
- Three: reveal the empty look.
- Four: relax into the next action.
That rhythm gives the brain time to register the effect.
Practice plan that actually works
Do not practice the whole vanish for an hour. Break it into small chunks.
First 10 minutes
Work only on the transfer into clip. No vanish. No speed. Just get the card behind the hand cleanly ten times in a row.
Next 10 minutes
Add the empty-hand display. Use a mirror, but also film from slightly left, slightly right, and slightly low. A move that fools only your bathroom mirror is not ready.
Next 10 minutes
Add the clean-up. This is where confidence comes from. Once you know where the card ends up, your hands stop looking guilty.
Final 5 minutes
Say your script out loud while doing it. Even one sentence helps. Magic gets better when your mouth gives your hands cover.
How to hide the “Instagram moment” inside a routine
This is the part that separates workers from copiers. The vanish should be a punctuation mark, not the whole sentence.
As an ambitious card kicker
The signed card comes to the top again. You show it cleanly, then it vanishes behind the hand. A beat later, it appears somewhere impossible. Pocket, wallet, card box, under a glass. Now the visual vanish has a reason to exist.
As a sandwich clean-up
Two kings trap a selection. You display the trapped card, then it vanishes behind the hand. Open the sandwich again and the middle card is gone. Much stronger than doing the move as a random flourish.
As a stand-alone flex in walkaround
If you want to use it by itself, keep it short. Produce a card, vanish it, then immediately reproduce it from the deck, pocket, or spectator’s shoulder line. A vanish without resolution can feel unfinished.
Common mistakes and easy fixes
The card flashes from the side
Your path is too wide, or your body is too square to the audience. Tighten the arc and turn slightly.
The card bends and sticks
You are gripping too hard. Relax. Also check your deck. Old warped cards fight back.
The empty hand looks posed
Do less. Let the hand look like a hand. Overacting is suspicious.
The vanish works only on camera
You are probably relying on one dead-on lens angle. Test it on a real person standing in front of you and another person a step to the side.
What makes this version show-ready
A show-ready move is not the one with the most finger gymnastics. It is the one you can trust when your hands are dry, someone is standing too close, and you are halfway through a set.
That means your final handling should meet this checklist:
- You can do it at normal speaking speed.
- You know your safe audience arc.
- You have a planned clean-up.
- You can place it inside a routine with a beginning and an ending.
If it passes those tests, you are not just chasing a trend. You are adding a useful tool.
At a Glance: Comparison
| Feature/Aspect | Details | Verdict |
|---|---|---|
| Visual impact | Very strong. The empty-behind-the-hand picture reads instantly to both live spectators and camera viewers. | Excellent if used as a quick punctuation point. |
| Difficulty | Moderate. The finger clip is learnable, but timing and angle control matter more than raw speed. | Good for intermediate card workers, reachable for beginners with focused practice. |
| Real-world usability | Works best in front-facing conditions with a planned clean-up and a routine reason for the vanish. | Strong in walkaround and social media, weaker when fully surrounded. |
Conclusion
The viral version sells the dream. The practical version gets the reaction. That is the goal here. Creators and spectators are obsessed with ultra-visual, one-handed card moments right now, and this vanish absolutely deserves the attention. But the real value comes when you turn that flash into a dependable piece of magic. Build a clean transfer, respect the angles, slow the timing just enough, and give the vanish a job inside a real routine. Do that and you get more than a trendy clip. You get a flexible move that can finish an ambitious card, clean up a sandwich sequence, or stand on its own in walkaround. That is how you stay ahead of hobbyists who only mimic what they scroll past. You are not just copying a reel. You are turning a social media visual into a working sleight you can trust in front of people.